Hosting your own blog is the kind of thing that every software developer wants to do. It's usually cheaper, you have control over your data, and you have the option to monetize it.
Whether you're a web developer or not, writing HTML can be cumbersome if you want to post fairly often. Most of the time you will want to focus on the content of your post, not on the code quality of the web page you're building to host it.
Here, Markdown is a great tool to speed up your blog posting capabilities.
Markdown
Markdown defines a set of rules that indicate what kind of formatting text should have. The following are some of the most basic rules:
| Element | Markdown Syntax | Example |
| Heading | # H1
## H2
### H3 | H1 H2 H3 |
| Bold | **bold text** | bold text |
| Italic | *italicized text* | italicized text |
| Blockquote | > blockquote | (Adds a quote container) |
| Ordered List | 1. First item
2. Second item
3. Third item |
|
| Unordered List | - First item
- Second item
- Third item |
|
| Code | `code` | code |
| Horizontal Rule | --- | |
| Link | [title](https://www.example.com) | title |
| Image |  | (displays image.jpg) |
Markdown makes it easy to write formatted text. For instance, the following snippet of Markdown:
# Welcome to my blog!

Start with the [first article](/blog/2022/9/markdown-to-html)
Gets formatted like follows:
Start with the first article
Many tools exist to build blogs from Markdown. Jekyll is a popular choice to build static websites out of Markdown.
However, when you are writing a technical blog, you will start noticing the limitations of working with out-of-the-box solutions. The point I hit these limits was with code formatting.
Limitation: Code formatting
Markdown has two ways of highlighting code. The block element:
```
public class App {
  public static void main(String[] args) { ... }
}
```
And the inline element
`System.out.println("Hello")`
PrismJS and Highlight.js are two JavaScript libraries to highlight code keywords for multiple programming languages.
With PrismJS, setting a language for formatting is as easy as introducing the library (along with the CSS for a given theme) and then adding the language name to the code block declaration. For the example above, we get the following result:
```java
public class App {
  public static void main(String[] args) { ... }
}
```
public class App {
  public static void main(String[] args) { ... }
}
But, what happens with the inline code? Markdown rules won't allow us to do something like
`System.out.println("Hello")`java
If we wanted to add custom CSS classes to Markdown-generated components, we find that Markdown doesn't specify the syntax to do so. Tools like Jekyll do allow for use of HTML elements inside Markdown, but it starts defeating a bit the purpose of using Markdown to speed-up writing.
If we want to extend Markdown syntax, we must modify the way Markdown is converted to HTML.
Getting our hands dirty: Introducing Unified
Unified is a framework to process Markdown. It's a plugin-based tool that allows you to inspect and modify the way Markdown is converted to other formats like HTML.
Its general structure looks like this:
import { unified } from 'unified'

const result = await unified()
  .use(...) // add a plug-in
  .process(await read('./example.md'))
Unified relies on two toolsets remark and rehype:
- remark: "remark is a tool that transforms markdown with plugins. These plugins can inspect and change your markup. You can use remark on the server, the client, CLIs, deno, etc."
- rehype: "rehype is a tool that transforms HTML with plugins. These plugins can inspect and change the HTML. You can use rehype on the server, the client, CLIs, deno, etc."
With a combination of plugins from these two toolsets, we can fully customize the way we parse Markdown into HTML.
Some common plugins are:
- remark-parse: remark plugin to add support for parsing markdown input.
- remark-rehype: remark plugin that turns markdown into HTML to support rehype.
- rehype-document: rehype plugin to wrap a fragment in a document.
- rehype-format: rehype plugin to format (pretty-print) an HTML document.
- rehype-stringify: rehype plugin to add support for serializing HTML (to string).
Putting all these plugins together, the example looks like this:
import { unified } from 'unified'
import remarkParse from 'remark-parse'
import remarkRehype from 'remark-rehype'
import rehypeDocument from 'rehype-document'
import rehypeFormat from 'rehype-format'
import rehypeStringify from 'rehype-stringify'
import { read } from 'to-vfile'

const result = await unified()
  .use(remarkParse)
  .use(remarkRehype)
  .use(rehypeDocument)
  .use(rehypeFormat)
  .use(rehypeStringify)
  .process(await read('./test/example.md'))
Where result is a VFile -a virtual representation of the HTML file- that can be easily saved as an HTML file.
Analyzing the transformation process
The following image represents the process the Markdown file follows to become HTML:

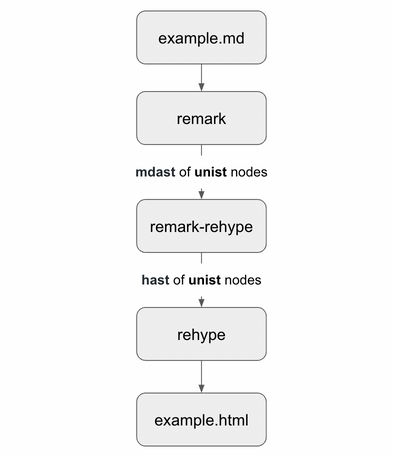
The following is a step-by-step description of the process:
- The Markdown file contents are read and placed into a
VFile. remarkparses and process the Markdown text, and converts it into an abstract syntax tree (AST). This tree is composed of unist nodes, which follow the Markdown Abstract Syntax Tree (mdast) structure.remark-rehypetranslates themdaststructure into a Hypertext Abstract Syntax Tree (hast) structure, also composed ofunistnodes.rehypeprocess and transforms thehaststructure into HTML.
Unified allows us to build plugins and process both the mdast and hast structures.
mdast and hast
Before we try to customize the transformation process, let us look at how mdast and hast are represented.
In mdast, each node represents an abstract element. For instance, the paragraph or p element is represented as follows:
{
  "type": "paragraph",
  "children": [{ "type": "text", "value": "Alpha bravo charlie." }]
}
That same node has the following representation in hast as follows:
{
  "type": "element",
  "tagName": "p",
  "properties": {},
  "children": [{ "type": "text", "value": "Alpha bravo charlie." }]
}
Notice that mdast has a different level of abstraction than hast: hast represents HTML elements, where "paragraph" is defined with the tag name p.
We can look at the same difference for code. The following markdown...
```
foo()
```
...becomes the following mdast:
{
  "type": "code",
  "lang": null,
  "meta": null,
  "value": "foo()"
}
...and the following hast:
{
  "type": "element",
  "tagName": "pre",
  "properties": {},
  "children": [
    {
      "type": "element",
      "tagName": "code",
      "properties": {},
      "children": [
        {
          "type": "text",
          "value": "foo()\n"
        }
      ]
    }
  ]
}
And the inline version `bar()` becomes the mdast:
{
  "type": "inlineCode",
  "value": "bar()"
}
...and the hast:
{
  "type": "element",
  "tagName": "code",
  "properties": {},
  "children": [
    {
      "type": "text",
      "value": "bar()"
    }
  ]
}
Notice that the block version of code wraps the <code/> HTML element in <pre/>, to preserve alignment and whitespaces. The inline version, however, just creates a <code/> element.
The block version allows us to add a value to the lang property. The following Mardown:
```js
foo();
```
...gets parsed as follows:
{
  "type": "code",
  "lang": "js",
  "meta": null,
  "value": "foo();"
}
and:
{
  "type": "element",
  "tagName": "pre",
  "properties": {},
  "children": [
    {
      "type": "element",
      "tagName": "code",
      "properties": {
        "className": ["language-js"]
      },
      "children": [
        {
          "type": "text",
          "value": "foo();\n"
        }
      ]
    }
  ]
}
The Markdown parser follows the HTML5 specification for <code/> to define the language used in that block: Using the lang attribute with a value of language-[LANG].
As we can see, we can use CSS to find <code/> blocks with class names for a given language (e.g. language-js) and process them accordingly.
In fact, PrismJS looks for <code class="language-[LANG]></code/> blocks to tokenize the text content and highlight keywords.
While the HTML5 specification allows for the use of lang in <code/> elements not wrapped in <pre/> elements, there is no defined way in the Markdown syntax to set that attribute.
Adding "lang" to inline code
We will extend the Rehype process to interpret inline code blocks like follows:
`highlighted^const inline = "code";`
We will split the contents of the code block in two: Text before a separator ^ and the text after that:
const [part1, part2] = ['markdown', 'const inline = "code";']
Then, we will use the first part as the code's class name, and the second part as its contents.
The following code snippet is an extract of the Rehype plugin rehype-inline-code-classname I published to NPM to allow setting a class name to inline code blocks:
import { Element, Root, Text } from 'hast'
import { Transformer } from 'unified'
import { visit } from 'unist-util-visit'

export function rehypeInlineCodeClassNamePlugin(
  options?: Options
): void | Transformer<Root, Root> {
  const separator = options?.separator ?? '^'
  const trailing = options?.trailing ?? false

  return function (root) {
    function extract(value: String) {
      const [_, part1, part2] =
        value.match(new RegExp(`(.+)\\${separator}(.+)`)) ?? []

      return trailing
        ? { className: part2, content: part1 }
        : { className: part1, content: part2 }
    }

    visit(
      root,
      'element',
      function visitor(node: Element, i: number | null, parent: any) {
        if (node.tagName !== 'code') return
        if (!parent || parent.tagName === 'pre') return

        const [{ value, ...rest }] = node.children as Text[]
        if (value.includes(separator) && value.length > 2) {
          const { className, content } = extract(value)
          node.children = [{ value: content, ...rest }] as Text[]
          node.properties = {
            className: className,
          }
        }
      }
    )

    return root
  }
}
export type Options =
  | {
      separator: string
      trailing: boolean
    }
  | void
  | undefined
Working with AST: visit
In this plugin, we use the function visit from unist-util-visit to navigate the hast tree and find all nodes:
visit(root, 'element',
      function visitor(node: Element, i: number | null, parent: any) {
        //..
      }
Notice that visit receives three parameters:
- The root node of the
hast. - The type of node we want to visit. In our example, it will iterate through all nodes of type
element. - A function that will receive references to the
node, and indexiand the node'sparent.
From here, we can modify the hast in any way we need to: Remove, add or update nodes.
Processing all "code" elements
We filter out all the nodes that don't have a tagName of code, and all tagName:code nodes that have a tagName:pre node as a parent, as those are block-type code elements:
if (node.tagName !== 'code') return
if (!parent || parent.tagName === 'pre') return
We get the node's value attribute and check if it contains the expected separator ^ (and the code element actually has enough characters for having left and right substrings):
const [{ value, ...rest }] = node.children as Text[]
if (value.includes(separator) && value.length > 2) {
  //...
}
If the value can be parsed with the separator, then we extract both substrings using a RegExp:
const [_, part1, part2] =
  value.match(new RegExp(`(.+)\\${separator}(.+)`)) ?? []
The plugin allows a configuration object to define a custom separator and whether we want to set the class name at the end of the block like follows:
`const inline = "code";^highlighted`
Depending on the configuration, we set className and content with part1 and part2; then we update the hast node as follows:
const { className, content } = extract(value)
node.children = [{ value: content, ...rest }] as Text[]
node.properties = {
  className: className,
}
We reset the node's children attribute with the actual content of the code block, and we set the className property to the substring we extracted using the separator.
Using the plugin
To include our plugin, we just need to add it to the chain of plugins after remark-rehype, as we're working with a hast:
import { myRehypePlugin } from '../src/plugin/index.ts'

const result = await unified()
  .use(remarkParse)
  .use(remarkRehype)
  .use(myRehypePlugin) // our rehype plugin
  .use(rehypeDocument)
  .use(rehypeFormat)
  .use(rehypeStringify)
  .process(await read('./test/example.md'))
We now can set any class name we need for inline code blocks:
`language-java^foo()`
will become:
<code class="markdown">^</code>
Revisiting code formatting
Since we now can set class names to our inline code blocks, we can use CSS and JavaScript to further format and style these elements:
code[class*='language-'] {
  background-color: #f2f5ff;
  padding: 0.1em;
  border-radius: 0.3em;
  white-space: normal;
}
Unfortunately, the changes we have done are not enough to operate with plugins like rehype-prism, as those assume <code/> blocks are wrapped by <pre/> elements. To highlight keywords in our code, we must use a tool to tokenize and highlight keywords, which is exactly what PrismJS does.
In a future blog entry, we will extend this example to use refractor to create a custom rehype plugin which extends rehype-prism's capabilities, and allows us to highlight keywords in inline code blocks.
Conclusion
Unified offers an ecosystem of plugins that allow us to extend and customize the way Markdown is converted to HTML.
Creating a rehype or remark plugin requires us to handle abstract syntax trees, but unist tools like unist-util-visit offer helper functions that reduce the level of complexity of these tasks.
Frameworks like NextJS integrate nicely with Unified/remark plugins, allowing to convert Markdown files to HTML which can be easily rendered in the application. They even offer integration with MDX, a superset of Markdown that allows the use of React components inside Markdown files.
However, Unified can be used to generate static HTML pages directly, allowing us to keep updated our self-hosted blogs.
On hosting
Free hosting for self-managed blogs exist out there. A good example is Github Pages, which integrates pretty nicely with tools like Jekyll. But we can just use HTML files created through Unified.

